
Implementing the Queue-Based Load Leveling pattern
In some cases you might want to process the requests that are coming into API Gateway in an asynchronous way. That could be happening for many reasons but usually you might want to do this if you want to avoid overwhelming some downstream integration.
Let’s imagine a scenario where you have an e-commerce website that receives a large number of requests to place orders during peak traffic periods. If your backend is unable to handle the requests you are losing orders. So you would need to find a way to handle these orders in an asynchronous way, allowing your workers to handle the orders later.
Now even if you would have Lambda functions as integration points for your API Gateway you could still run into issues when Lambda functions are unable to handle the requests due to various factors. For example you could run into the account concurrency limit and then your Lambda functions would get throttled. Or it could happen that you have such a massive burst of traffic that even if your concurrency quotas are not a problem you could run into the burst limits for Lambda in a particular region (which cannot be modified).
So if your application can handle an asynchronous way of operating you can implement the Queue-Based Load Leveling pattern where you add queue as integration for your API Gateway method and then your workers (which could be Lambdas or other services) can pick up the messages from the queue and process them. Your queue will act as a buffer in this case.
If you work with AWS then SQS or the Simple Queue Service is the natural choice for queues as it is both a highly available and scalable service and it is actually supported by the API Gateway out of the box.
In this case the flow of data would look like in the diagram below:

Some of the benefits in this case would be:
- Decoupling of the request handling process from the API Gateway, allowing for more flexibility and scalability
- Improved fault tolerance and availability, as requests can be buffered and processed even if the backend workers are unavailable for some reason
- Ability to handle a large number of requests in parallel, improving overall performance
Implementation
So let’s implement it below (at the end of the article there is also a video guiding you how to do it).
1. Create an SQS queue
First we will create the SQS queue that we are going to use, as we need the URL and the ARN of this queue for the next steps.
- Go to the AWS Management Console and find SQS (Simple Queue Service). You can find it in the Services menu under Application Integration
- Click on “Create queue“
- For Type choose “Standard“
- For Name type any name, example: MyLoadLevelerQueue and then click on “Create queue“
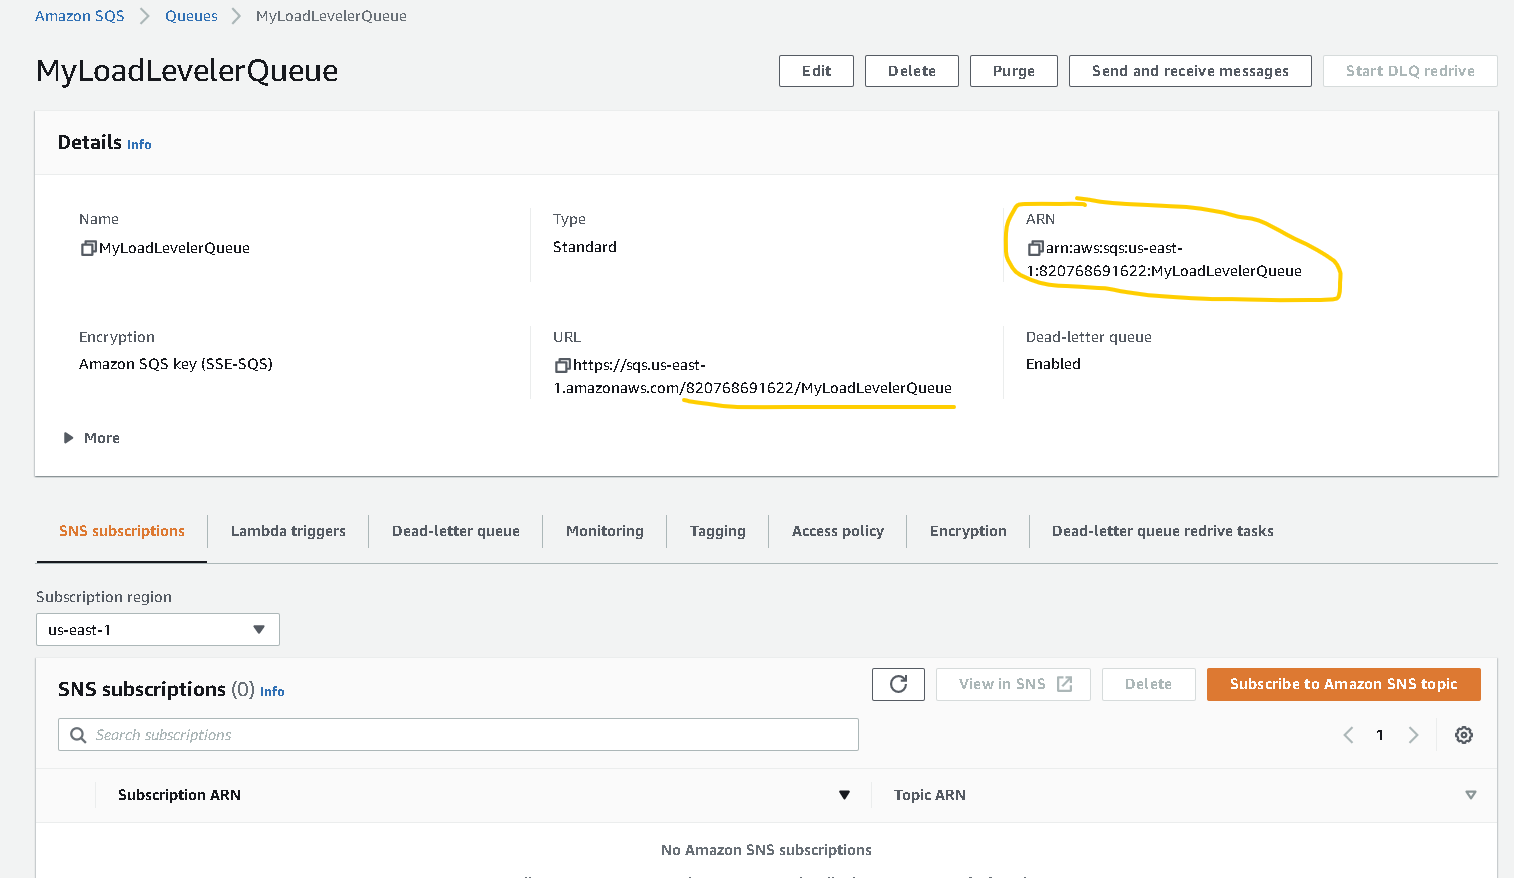
- From the “Queue URL” extract the account number and queue name (see screenshot below). It has to have the format ACCOUNT_ID/queuename. Example: 012345678912/MyLoadLevelerQueue. You will need this later
- Also write down the “Queue ARN” (see screenshot below).
2. Create an IAM policy
Then we need to create an IAM policy and then a Role, this will define the permissions, we are going to need this for our API Gateway to send messages to the Queue
- In the AWS Management Console find the IAM service (Services menu -> Security, Identity & Compliance -> IAM)
- Go to Policies and then click on “Create Policy“
- Switch to the JSON tab
- Add the following policy and make sure you replace SQS_QUEUE_ARN with the ARN of your SQS queue (what you copied above when you created the queue)
{
    "Version": "2012-10-17",
    "Statement": [
        {
            "Effect": "Allow",
            "Action": "sqs:SendMessage",
            "Resource": "SQS_QUEUE_ARN"
        }
    ]
}- Click on “Next: Tags” and then “Next: Review”
- Give the policy a name, for example: MyLoadLevelerQueuePolicy and then click on “Create policy“
3. Create an IAM role
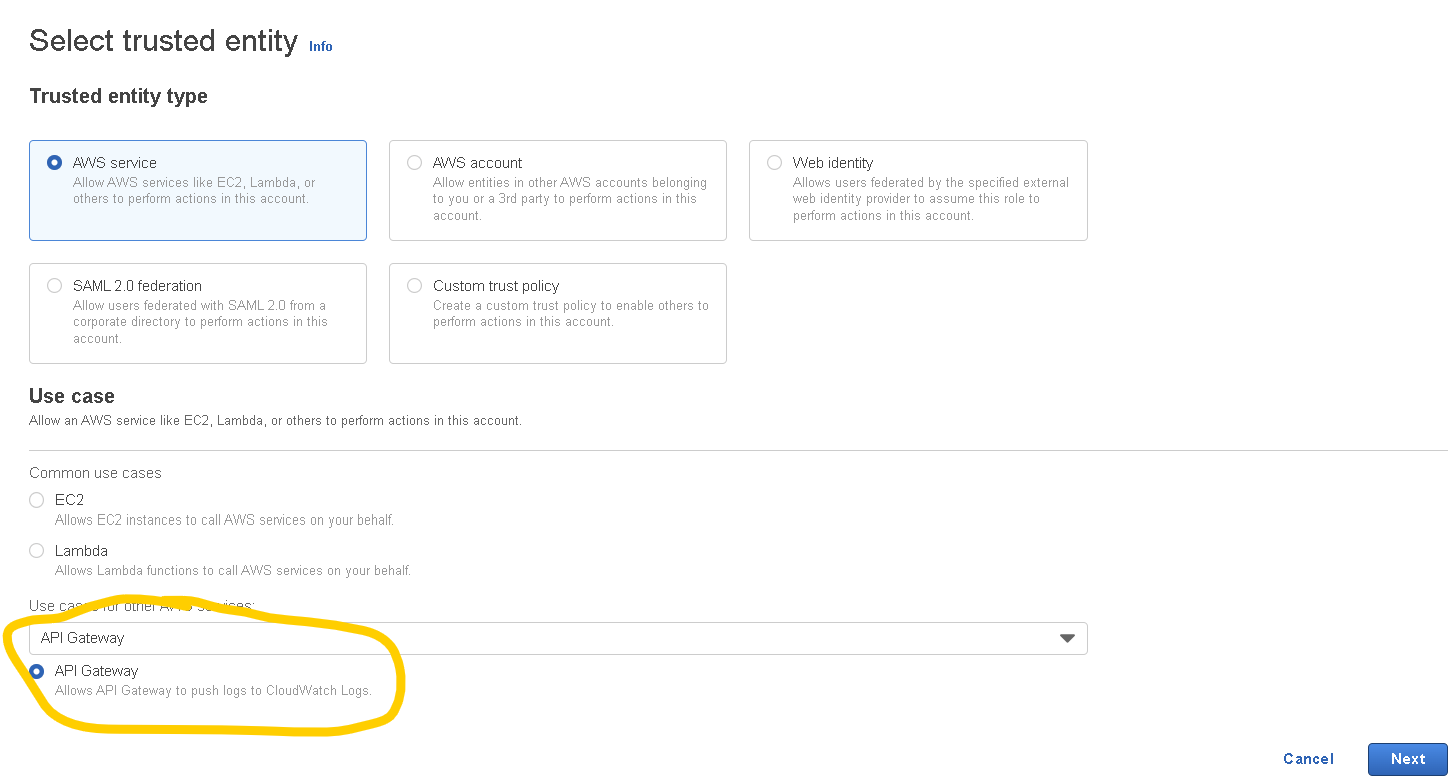
- In the IAM console click on Roles and then on “Create role“
- For Trusted Entity Type choose API Gateway from the dropdown called “Use cases for other AWS services” (just like in the screenshot below)
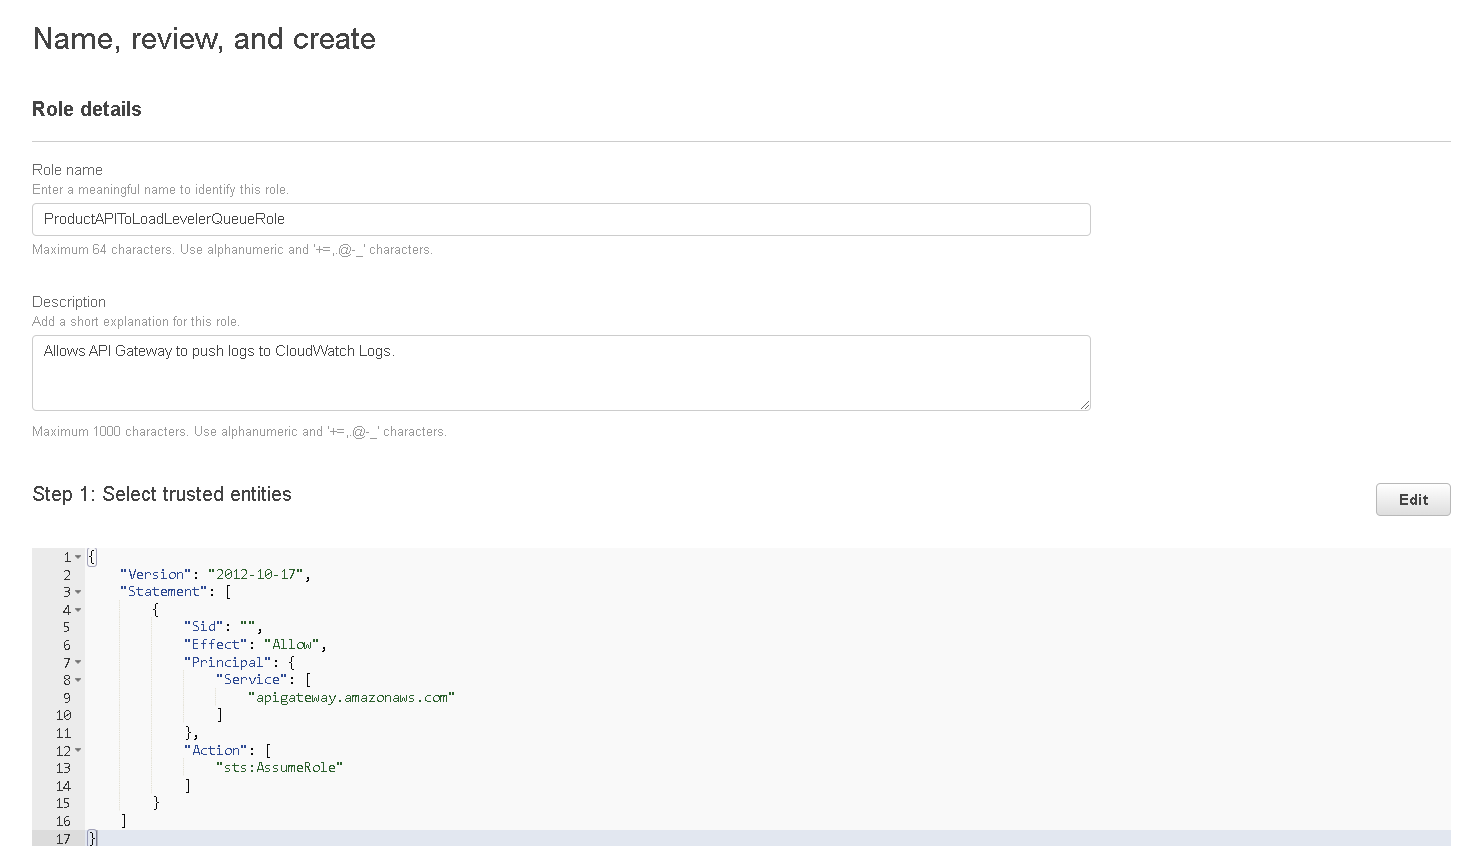
- Click on “Next” then “Next” again, give the role a name (this can be anything you want) then click on “Create role“
- The role will be saved but you need to open it again, find it in the list, click on the name
- When the page is loaded with the role details click on “Add permissions” and choose “Attach policies” from the dropdown.
- Find the policy you created previously (Step 2) and select it then click on “Attach policies” and then copy the “ARN” of the role, you will need this later.

4. Create API Gateway and configure it
- Go to the API Gateway service (Services menu -> Networking & Content Delivery -> API Gateway)
- Click on “Create API” and then on the “REST API” choose “Build” (make sure you don’t choose REST API Private)
- On the next page make sure you have “REST” selected and “New API” selected, then give your API a name then click on “Create API“
- On the API page open the “Actions” dropdown select “Create Resource” and give a name to your resource, for example: “sqs-lambda” then click on “Create Resource“
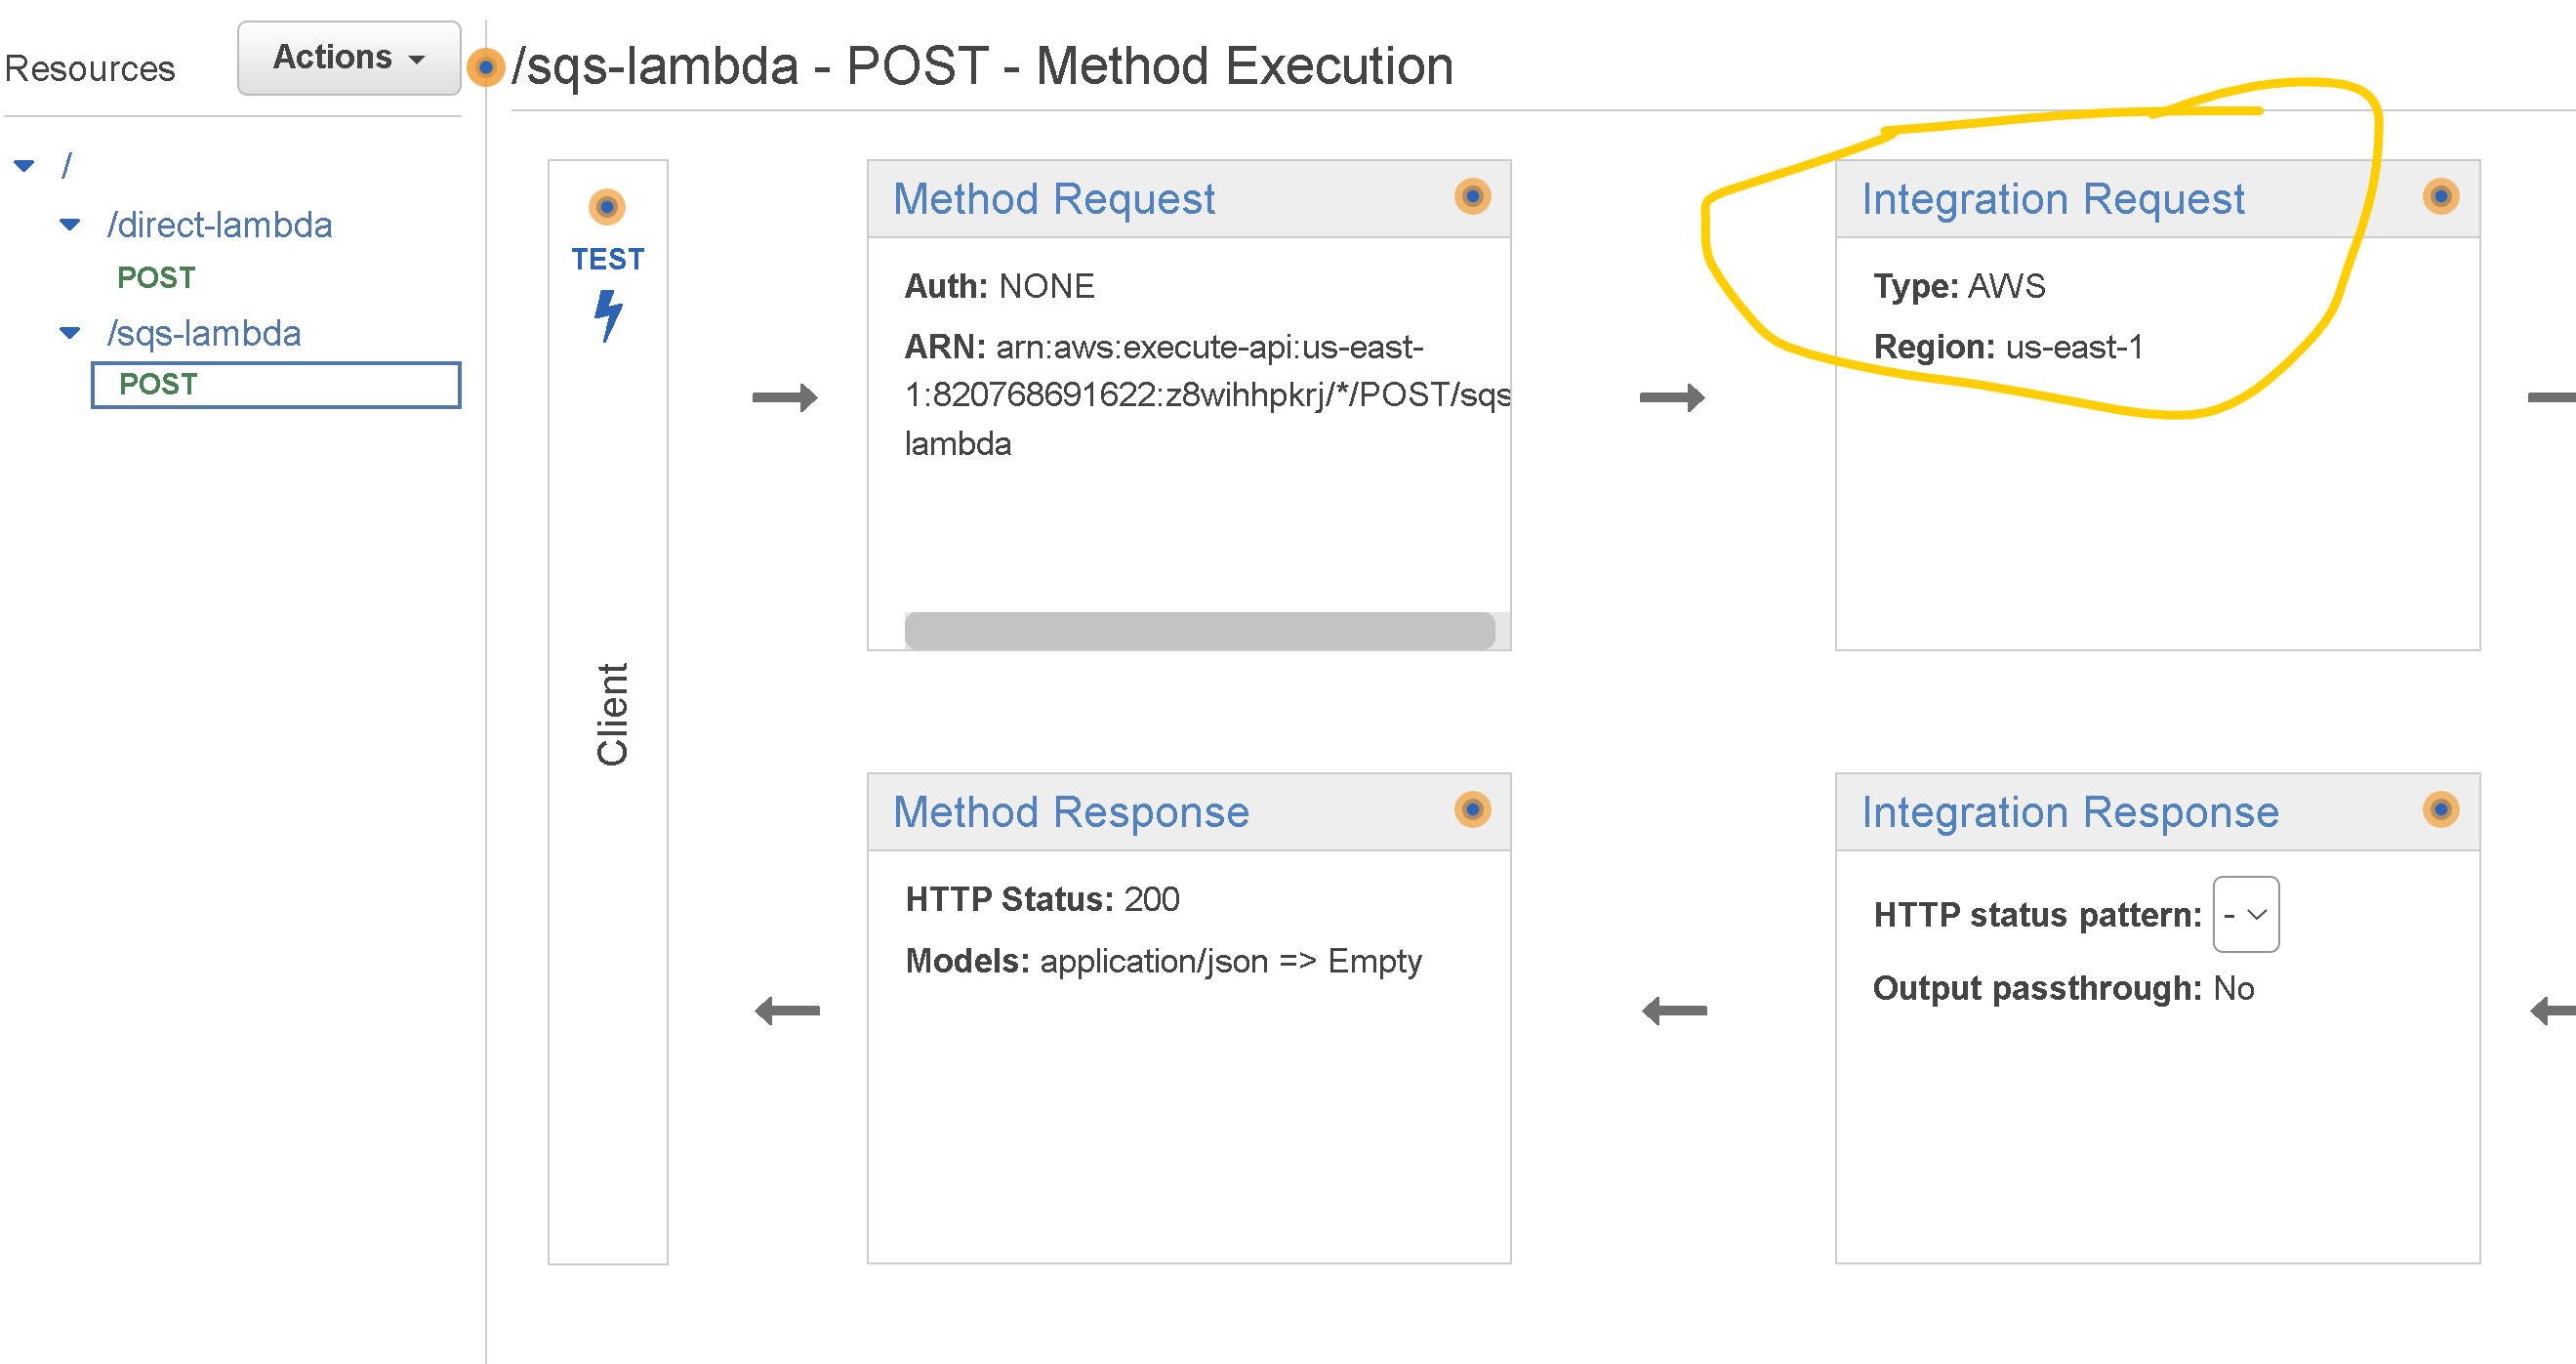
- Click on the resource that you just created then on the “Actions” menu again and select “Create Method“.
- On the created method select “POST” and then click on the checkmark.
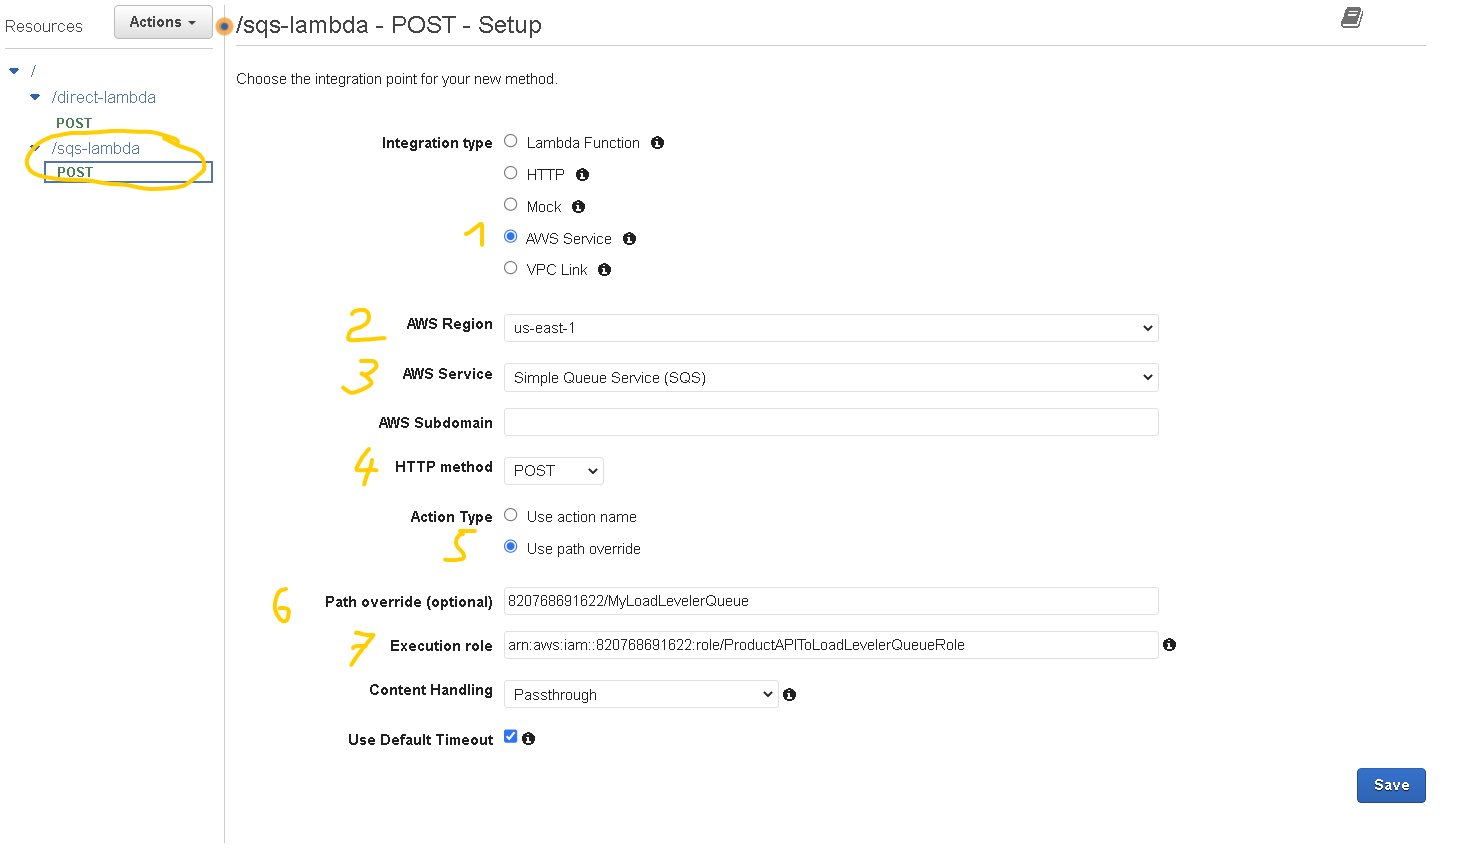
- You will see the integration page where you need to setup some additional stuff (refer to the screenshot below (numbers match screenshot numbers).
- 1. For integration type select “AWS Service”
- 2. For the AWS region select your preferred region
- 3. For AWS Service select “Simple Queue Service (SQS)“
- 4. For HTTP method select “POST“
- 5. For Action Type select “Use path override“
- 6. For Path override fill in the queue URL that you saved at step 1. It should be in the following format: ACCOUNT_ID/queuename Example: 012345678912/MyLoadLevelerQueue
- 7. For the Execution role paste in the ARN of the Role that you created at step 3 and then click “Save“
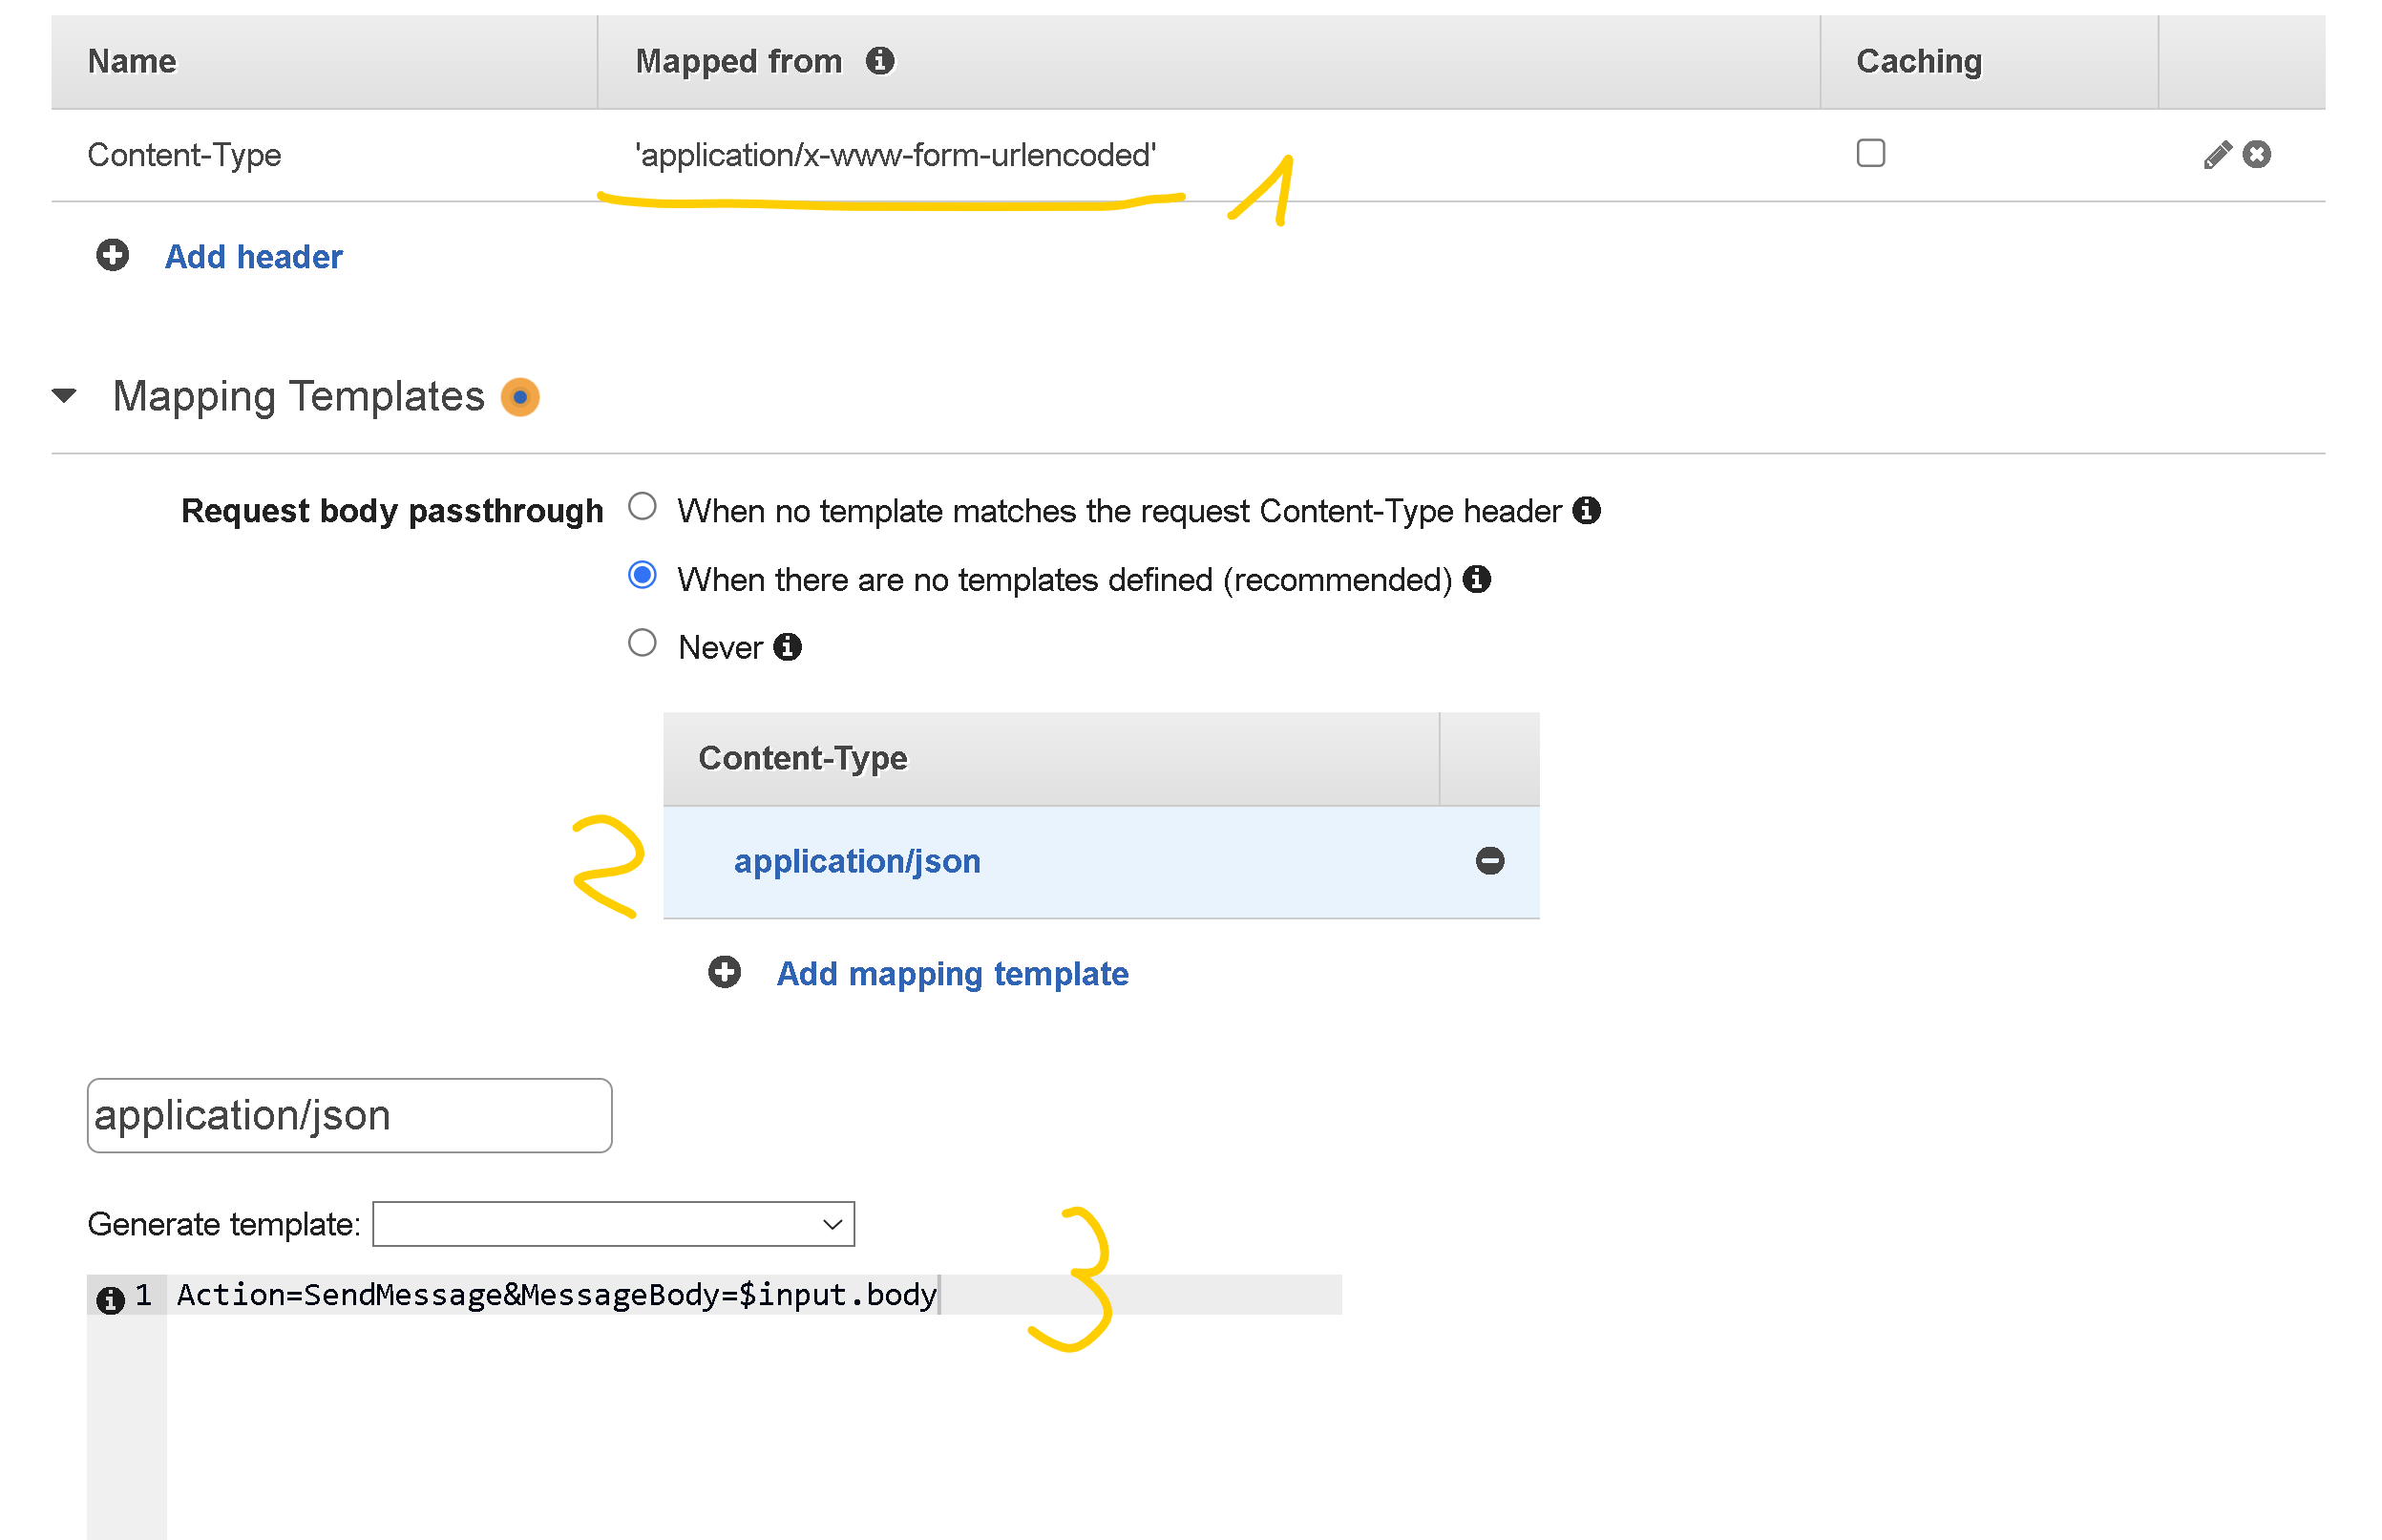
- On the page that is shown select “Integration Request”
- Scroll down to HTTP Headers and expand it
- Click on “Add header” and then for Name enter Content-Type and for the Mapped from field enter ‘application/x-www-form-urlencoded’ (make sure you add the single quotes as well) and then click on the checkmark to save it (1)
- Expand Mapping Templates and for the Request body passthrough, select the option that fits your needs
- Choose Add mapping template and then for Content-Type, enter application/json and choose “Create“. (2)
- For the template, enter Action=SendMessage&MessageBody=$input.body then click on “Save” (3)
5. Deploy and test the API
- While still on the API page click on the “Actions” dropdown and select “Deploy API” then in the Deployment stage dropdown select [New Stage] , give it a name, example: prod and then click “Deploy“
- Test the integration with curl from the command line, make sure to replace the following:
- API_ID with the ID of your API (you can find this in the API Gateway console, go to the list of your API Gateways and in the list there is also the ID besides the name)
- REGION with your preferred region id, for example us-east-1
- STAGE with the stage you created earlier (I used prod above)
- RESOURCE with the name of your resource (route), I used sqs-lambda above.
- For the message you can write some message that you want
curl --location --request POST 'https://API_ID.execute-api.REGION.amazonaws.com/STAGE/RESOURCE' \
    --header 'Content-Type: application/json' \
    --data-raw '{
        "message": "This is the message that should be sent to SQS"
    }'
You should be getting back something like this:
{
   "SendMessageResponse":{
      "ResponseMetadata":{
         "RequestId":"38bcbc0d-dec1-5971-a653-e04560d73ece"
      },
      "SendMessageResult":{
         "MD5OfMessageAttributes":null,
         "MD5OfMessageBody":"d117718ecf5e1016a6d35ee71b7a3c69",
         "MD5OfMessageSystemAttributes":null,
         "MessageId":"e3880f14-80f6-47bb-a45b-b69c8cddc887",
         "SequenceNumber":null
      }
   }
}
So that’s about it. Now you should have a working integration between API Gateway and SQS and your incoming requests will be sent to SQS from where you will be able to process them in an asynchronous manner.
Here is the walkthrough in video format if you find that easier to follow: